

The Mastering Adolescents’ Knowledge and Engagement in Research (MAKE:Research) program was designed to teach teens with type 1 diabetes about the research process through the lens of Maker culture and technology. Through a series of workshops, students built interactive LED accessories that could respond to different types of data input. Students then conducted research studies, designing their own research questions related to their T1D, and used their LED accessories to display their results in an engaging way. Along the way, they learned about the research process, including the ethics involved in human studies and how to distribute findings.


Download the Make Research Workbook
BASIC Arduino Tutorial
This tutorial will guide users through programming the Adafruit Neopixel Ring to visualize glucose data. We will begin by introducing basic C programming concepts, do a trial run using a sample code, and then begin the CGM data code.
Note: This tutorial uses the Desktop Arduino Editor, a Mini USB syncing cable, and a Neopixel Ring that has already been configured to an Adafruit Trinket M0.
Installation Steps
For Windows PCs:
1) Download the Arduino IDE program from: https://www.arduino.cc/en/Main/Software
2) Install the necessary drivers.
To connect the Arduino board to your PC: https://www.silabs.com/products/development-tools/software/usb-to-uart-bridge-vcp-drivers
To recognize the LED ring (Adafruit): https://github.com/adafruit/Adafruit_Windows_Drivers/releases/download/2.3.4/adafruit_drivers_2.3.4.0.exe
Note: When drivers are properly installed, you will see a USB serial port option under Tools → Port → [the port’s name will vary by computer]
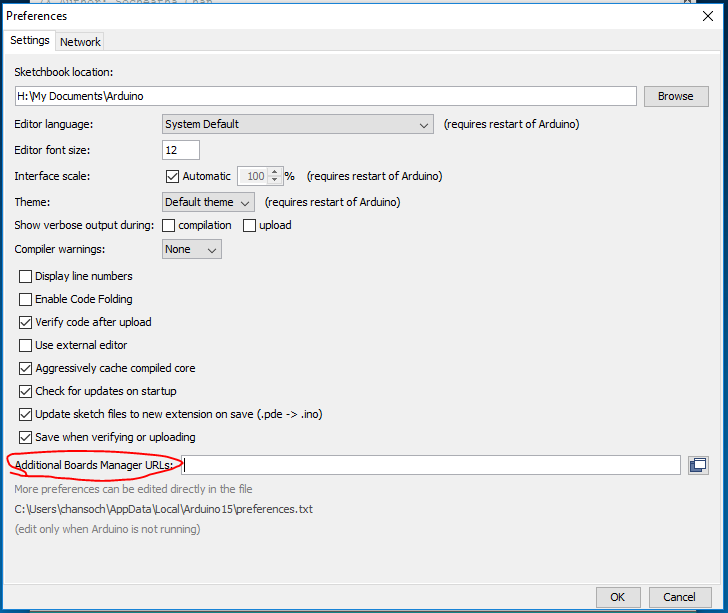
3) Open the Arduino IDE program and click File → Preferences. In the field marked “Additional Boards Manager URLs” copy and paste: https://adafruit.github.io/arduino-board-index/package_adafruit_index.json and click “OK”.
4) Go back to the Arduino IDE program and click Tools → Board → Boards Manager. Search for “Adafruit SAMD boards by Adafruit” and install that package by clicking “Install”.

5) Click Tools→ Manage Libraries and search for “Adafruit Pixel”. Install that package by clicking “Install”.
6) Restart the program to apply these changes.
7) Click on Tools → Board. You should see an option for “Adafruit Trinket M0”. Select this board.
For Mac Computers:
Follow the same process as Windows, but ignore the Adafruit driver from step 2.
C Basics
C is the programming language used by Arduino. Here are some basic commands:
Syntax
#include <libraryname.h>
Tells the program what libraries you will be referring to throughout your code. Libraries are a set of pre-defined functions.
setup( )
A function that runs when the Arduino is powering up. This may include telling the pixels when to turn on, or the brightness level of the pixels
int or uint16_t
Describes an object type as a number (int), or a number with exactly 16 bits (uint16_t)
void loop ( ) { }
The section where you run your functions. The information that you want to be displayed on the Neopixel ring occurs between the curly braces of the loop.
/* comment here */
used for long comments
// comment here
used for in-line comments
void function( ) { }
Where functions are defined, which usually happens at the end of the code. The code occurs between the curly braces of the function.
Steps to write C program:
Create
Verify
Upload
Get Output
Basic structure of an Arduino program:
Structure - usually contains a setup() and a loop()
Values - declaring string types, variables, and constants
Functions - defining functions that tell the program what to do
Things to remember:
Code is case sensitive
Each statement ends with ;
Before we get started:
Make sure the correct Port is selected in the Arduino Editor
Port → /dev/cu.usbmodem14301
Note: this may vary between computers, but there is usually only one option. The device needs to be connected for the Port to appear.
If the port is not appearing and the correct drivers are installed, you may need to reset your board
Make sure the correct Board is selected in the Arduino Editor
Board → Arduino Trinket M0

Sample Code
Note: This section was adapted from the “strandtest” example available in the Arduino Editor. This can be found at:
File → Examples → From Libraries → Adafruit NeoPixel → strandtest
Since we are using a NeoPixel Ring and not the strand, we have to modify this example.
For this process, we will open a new sketch, erase the template, and paste in the code bits below.
NOTE: Most of the functions used in this example are pre-defined in the Adafruit Neopixel library. (Optional: more information on Adafruit Neopixel functions).
Every code written for the NeoPixel Ring starts with the first section below. This section is where you set up the NeoPixel Ring. This prepares the data pin for NeoPixel output. The comments, denoted by /* */ or //, aren’t necessary, but are used to help the reader understand the purpose of the code.
/* Author: Jane Doe
Function: ring test */
#include <Adafruit_NeoPixel.h>
#define PIN 0
#define NUM_LEDS 24
// Parameter 1 = the pin number that the arduino is attached to (shown in image above)
// Parameter 2 = number of leds in pixels
Adafruit_NeoPixel pixels = Adafruit_NeoPixel(NUM_LEDS, PIN);
There are a many different ways to customize the color. For example, the colorWipe() function paints a color, one pixel at a time, over the length of the ring.
All of the code that occurs in the void loop() {} portion is where you are providing instructions to the NeoPixel Ring. You are informing the ring of what function to use (colorWipe), what colors you would like (pixels.Color(255, 0, 0)), and the speed of rotation (50). Repeating the function with different colors will show the colors in a series. The second part of the code, the void colorWipe() {} portion is where the function is being defined. Without this section, the program would not be able understand how to run the function. You will not have to modify anything here.
Note: For a list of RGB color codes, check out https://htmlcolorcodes.com/
void loop() {
theaterChase(pixels.Color(127, 127, 127), 50); // White
theaterChase(pixels.Color(127, 0, 0), 50); // Red
theaterChase(pixels.Color(0, 0, 127), 50); // Blue
}
//Theatre-style crawling lights.
void theaterChase(uint32_t c, uint8_t wait) {
for (int j=0; j<10; j++) { //do 10 cycles of chasing
for (int q=0; q < 3; q++) {
for (uint16_t i=0; i < pixels.numPixels(); i=i+3) {
pixels.setPixelColor(i+q, c); //turn every third pixel on
}
pixels.show();
delay(wait);
for (uint16_t i=0; i < pixels.numPixels(); i=i+3) {
pixels.setPixelColor(i+q, 0); //turn every third pixel off
}
}
}
}
This code allows users to choose individual pixels to light up and assign each pixel a color. The first number designates which light to change. The following three numbers are the color, written in RGB format.
void setup() {
pixels.begin();
pixels.show();
pixels.setBrightness(10); // this setting changes the brightness of the LEDs
}
void loop() {
/* to light up individual pixels (static)*/
pixels.setPixelColor(0, 255, 87, 51); // (pixel position, red, green, blue)
pixels.setPixelColor(4, 255, 189,51);
pixels.setPixelColor(8, 219, 255, 51);
pixels.setPixelColor(12, 117, 255, 51);
pixels.setPixelColor(16, 51, 255, 87);
pixels.setPixelColor(20, 51, 255, 189);
pixels.show();
}
Once the code is written out, the next step is to Verify the script. This is a form of error checking and putting all of the components of the code together. If this step is completed without returning an error, you may Upload and see your NeoPixel ring come to life!
Additional Resources
Ladyada’s Learn Arduino Tutorials
Hardware information, installation help
Executing sample code
Modifying code
Arduino Library Use
https://learn.adafruit.com/adafruit-neopixel-uberguide/arduino-library-use
Back to projects